
ℹ️ INFERENCE DEFEND
Custom scanners are only available in our Inference Defend product.
In addition to the scanners provided with CalypsoAI, you may want to create your own custom scanners with specific configurations, depending on your particular requirements.
ℹ️ PREREQUISITES
Make sure you have the required permissions to create and edit scanners, and add scanners to projects.
In this tutorial, we are going to create and iterate over multiple versions of a keyword scanner that scans for and blocks proprietary product codes from being sent in a prompt, and add the scanner to a project.
Learn more about custom scanners
To get familiar with custom keyword scanners, this tutorial will walk you through the following:
- Creating your custom keyword scanner
- Testing your scanner
- Publishing your scanner
- Adding your scanner to a project
- Updating your scanner
- Testing your updated scanner
- Publishing your updated scanner
- Updating your scanner in a project
Creating your custom keyword scanner
To begin, let’s create the first version of your custom keyword scanner.
Learn more about scanner versioning
For this first version, we are going to create a scanner that scans for and blocks prompts that contain the proprietary product code PROD0001.
To create your custom keyword scanner:
- Log in to CalypsoAI.
- From the menu, in the Configuration section, select Playground.
- Select Build a custom scanner > Keyword scanner.
The Keyword scanner window is displayed.
- In Name, enter ProductCodes.
The scanner name is the primary identifier displayed when working with scanners. It makes it easy to quickly locate a scanner in the menu or when using the search. - In Keywords, enter PROD0001, and press Enter.
The entries in the Keywords field represent the keywords for which the scanner searches. - From the Scan list, select Prompts.
The option you select from the Scan list determines the scanning direction of the scanner.
With Prompts selected, this scanner version scans only user prompts. - In Add Tags, enter ProductCodes, and press Enter.
Adding tags to your scanners allows you to group scanners, for example, by functionality or use case, and makes it easier to find scanners using the search.
ℹ️Tags are optional, and you can enter more than one tag.
- Select Save.
The Save new version window is displayed.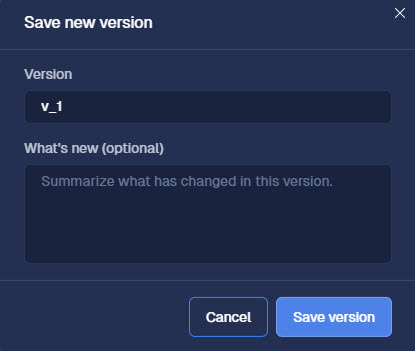
- In Version, enter ProductCodes_v1.
The version name is the primary identifier displayed when working with scanner versions. Each version should have a meaningful name and a consistent versioning format, for example, <scanner name>_v<version number>.
ℹ️Avoid overloading version names with too much meaning, their purpose is to simply show a clear version history.
You can add additional information to What’s new (optional). - In What’s new (optional), enter Blocks prompts that contain the PROD0001 product code.
This summary field allows you to easily compare the changes in functionality between different scanner versions. The summary should include a concise description of the changes introduced in each scanner version, and, as good practice, all summaries should follow the same format and style for consistency and clarity. - Select Save version.
Your custom keyword scanner is saved, and you can find it in the Playground tab, at the top of the Custom scanners list.
Testing your scanner
After creating your custom keyword scanner, you should test it to make sure the scanner functions as configured and blocks any prompt that mentions PROD0001.
To test your custom keyword scanner:
- From the menu, in the Configuration section, select Playground.
- In the Custom scanners list, find the ProductCodes scanner, and select Test.
The test chat box is enabled.
- If you want to test the scanner with a specific model, select Test with a model, and from the list, select a model.
ℹ️In this tutorial, we are only scanning prompts, so you don’t need to test with a model. However, if a scanner is configured to scan responses, it must be tested with a model. - In the chat box, enter Provide a technical description of PROD9999, and press Enter.
The scanner scans your prompt.
As the prompt does not mention PROD0001, the scanner passes the prompt and a green Passed message is displayed.
- In the chat box, enter Provide a technical description of PROD0001, and press Enter.
The scanner scans your prompt.
As the prompt directly mentions PROD0001, the scanner blocks the prompt and a red Blocked message is displayed.
If your test results differ from the ones shown in our examples, do the following:
- In Playground > Custom scanners, find the ProductCodes scanner, and make sure you input the PROD0001 scanner keyword correctly, without any typos.
- In Playground > Custom scanners, find the ProductCodes scanner, and make sure you configured the scanner to scan prompts only.
- When testing the scanner, make sure you input the provided prompts exactly as they are given in this procedure.
Publishing your scanner
Now that you’re happy the scanner is functioning as configured, it’s time to publish it. Publishing a custom scanner makes it available for use in your projects and scanner packages.
ℹ️ PUBLISHING A SCANNER
You cannot publish a scanner as a whole. Instead, you must select a version you want to publish.
To publish your custom keyword scanner:
- From the menu, in the Configuration section, select Playground.
- In the Custom scanners list, find the ProductCodes
- Hover over the ProductCodes_v1 scanner version entry, and select Publish.
The ProductCodes_v1 scanner version is published and made available for use.
Adding your scanner to a project
Next, we’re going to add the first version of your scanner to a project, and then enable that version in the project. Projects allow you to create different scanner configurations, and manage access to specific models for selected groups of users assigned to a project.
ℹ️ PREREQUISITES
For the purposes of this procedure, you must use an existing project.
To add your custom keyword scanner to a project:
- From the menu, select Projects.
- Find your project, and select View.
- In the Scanners section, select Add scanners.
- In the Custom scanners list, find the ProductCodes scanner, and select Add.
The ProductCodes scanner is added to your project.
To enable your custom keyword scanner:
- Navigate to your project’s main page.
- In the Custom scanners list, find the ProductCodes scanner, and select Enable.
- Under Mode, select Block.
The ProductCodes_v1 version of your ProductCodes scanner is enabled and active in your project.
Updating your scanner
After creating the first version of a custom scanner, you may need to update it. Reasons for updating a scanner can include:
- An incorrect scanner configuration
- A change in the use case
- A product update
Learn more about scanner versioning
In our product code scenario, we are told that PROD0001 was updated to PROD0011 and a new product with product code PROD1234 was created. So, we need to update the ProductCodes scanner with this new configuration.
To update your custom keyword scanner:
- From the menu, in the Configuration section, select Playground.
- In the Custom scanners list, find the ProductCodes scanner, and select
 .
.
The Edit menu is displayed.
At the bottom of the Edit menu, you can see the list of all the projects to which this scanner is added. This list is displayed only after the scanner was added to at least one project.

- In Keywords, do the following:
- Delete PROD0001.
- Enter PROD0011, and press Enter.
- Enter PROD1234, and press Enter.
- Select Save.
The Save new version window is displayed. - In Version, enter ProductCodes_v2.
- In What’s new (optional), enter Updated PROD0001 to PROD0011 and added PROD1234.
- Select Save version.
ProductCodes_v2 is created and added to the top of the Version history list.
The Version history list displays a running list of all versions created for the ProductCodes scanner, with the oldest version at the bottom and the most recent version at the top. It also shows which versions are published.
Testing your updated scanner
Let’s test your updated custom keyword scanner to make sure the new configuration is functioning as expected.
To test your updated custom keyword scanner:
- From the menu, in the Configuration section, select Playground.
- In the Custom scanners list, find the ProductCodes.
- In the Test more versions list, select ProductCodes_v2, and clear ProductCodes_v1.
💡The Test more versions list contains all versions of the scanner. If you want to test scanner versions against each other, you can select multiple versions from the list, or even versions of different scanners present in the Custom scanners list. - Select Select.
- Make sure Test is selected.
The test chat box is enabled.
- In the chat box, enter Provide a technical description of PROD0001, and press Enter.
The scanner scans your prompt.
As the prompt does not mention PROD0011 or PROD1234, the scanner passes the prompt and a green Passed message is displayed. - In the chat box, do the following:
- Enter Provide a technical description of PROD0011, and press Enter.
- Enter Provide a technical description of PROD1234, and press Enter.
For both inputs, the scanner scans your prompt.
As the prompts directly mention PROD0011 and PROD1234, the scanner blocks the prompt and a red Blocked message is displayed both times.
Publishing your updated scanner
Now that we’re happy the updated scanner is functioning as configured, it’s time to publish it.
To publish your updated custom keyword scanner:
- In the menu, in the Configuration section, select Playground.
- In the Custom scanners list, find the ProductCodes
- In the Test more versions list, select ProductCodes_v2, and select Select.
- Hover over the ProductCodes_v2 scanner version entry, and select Publish.
A confirmation window is displayed.
ℹ️Because we already added the scanner to a project, the confirmation window gives the following options:- Push to projects: Force pushes the ProductCodes_v2 version to the project, enabling the version automatically.
- Allow opt in: Adds the ProductCodes_v2 version to the project but doesn’t enable it. This option lets project admins update the project with the new scanner version themselves, at their preferred time, ensuring an uninterrupted service in case of problems with the new scanner version.
- Select Allow opt in.
The ProductCodes_v2 scanner version is published and added to your project.
Updating your scanner in a project
Our final step in this tutorial is to update to our new ProductCodes_v2 scanner version in a project.
ℹ️ PREREQUISITES
Make sure you select the same project as in Adding your scanner to a project.
To update your custom keyword scanner in a project:
- From the menu, select Projects.
- Find your project, and select View.
ℹ️In the Custom scanners list, next to the ProductCodes scanner name, an Update available label is present. The Update available label is displayed when a new version of a scanner is published and available for use in the project. - In the Custom scanners list, select the ProductCodes
- Select Update available.
The Update available confirmation window is displayed. - Select Update.
The ProductCodes_v2 scanner version is selected and marked as Active in the list.
That’s it! Your custom keyword scanner is configured, updated, and used by a project.